Ever had your computer crash after a bad update or rogue software? Don’t panic—system restore can turn back the clock and save the day. It’s like a time machine for your PC, and we’ll show you exactly how to use it.


What Is System Restore and How Does It Work?

System Restore is a built-in Windows feature designed to roll back your computer’s system files, settings, and programs to an earlier point in time. It doesn’t affect personal files like photos, documents, or emails, making it a safe way to undo system-level changes that may be causing instability.
Understanding the Core Mechanism
System Restore works by creating what are known as ‘restore points’—snapshots of your system’s configuration at specific times. These include registry settings, system files, installed programs, and drivers. When you initiate a system restore, Windows reverts these components to their state at the selected restore point.
- Restore points are created automatically before major system events (e.g., updates or installations).
- Users can also manually create restore points.
- The feature uses minimal disk space by storing only changes (deltas) between points.
When System Restore Is Most Useful
System Restore shines in scenarios where your PC becomes unstable due to software changes. Common triggers include:
- Failed Windows updates
- Malware infections
- Driver conflicts
- Unwanted changes from third-party software
“System Restore is not a backup tool, but a recovery tool for system state.” — Microsoft Support
How to Enable System Restore in Windows 10 and 11
By default, System Restore may be disabled on some Windows installations, especially on newer PCs or custom builds. Enabling it is the first step to ensuring you have a safety net.
Step-by-Step Activation Guide
To enable System Restore, follow these steps:
- Press Windows + S and type “Create a restore point”.
- Open the result and go to the System Protection tab.
- Select your system drive (usually C:) and click Configure.
- Choose Turn on system protection.
- Adjust the disk space usage (recommended: 5–10%) and click OK.
Once enabled, Windows will begin creating automatic restore points.
Customizing Restore Settings
You can fine-tune how System Restore behaves:
- Disk Space Usage: Limit the amount of storage used for restore points.
- Restore Point Frequency: While you can’t manually schedule them, Windows creates them before updates and installations.
- Protection for Other Drives: You can enable System Restore on non-system drives, though it’s rarely necessary.
Creating a Manual Restore Point
Before making significant changes to your system—like installing new software or updating drivers—it’s wise to create a manual restore point. This gives you a known-good state to return to if something goes wrong.
Why Manual Restore Points Matter
Automatic restore points are helpful, but they’re not foolproof. Windows may not create one before every software change, especially if the installer bypasses system checks. A manual restore point ensures you have a fallback option.
- Provides control over when a snapshot is taken.
- Essential before risky operations like registry edits or driver updates.
- Can be labeled for easy identification (e.g., “Before Adobe Install”).
How to Create One in Minutes
Follow these steps:
- Open “Create a restore point” from the Start menu.
- Click System Protection tab, then Create.
- Type a descriptive name (e.g., “Pre-Update Backup”).
- Click Create and wait for confirmation.
The process takes less than a minute and could save hours of troubleshooting later.
Performing a System Restore: Step-by-Step Guide
When your system starts acting up, initiating a system restore can resolve issues without a full reinstall. Here’s how to do it safely and effectively.
Accessing System Restore from Windows
If you can boot into Windows, use the built-in tool:
- Search for “Create a restore point” and open it.
- Click System Restore on the bottom left.
- Click Next and choose a restore point from the list.
- Review the date, time, and description, then confirm.
Windows will restart and begin the restoration process.
Using System Restore from Safe Mode
If Windows won’t start normally, boot into Safe Mode:
- Restart your PC and hold Shift while clicking Restart.
- Go to Troubleshoot > Advanced Options > System Restore.
- Follow the prompts to select a restore point.
This method is crucial when system instability prevents normal login.
Restoring from Windows Recovery Environment (WinRE)
If the OS fails to boot entirely, use a recovery drive or installation media:
- Boot from USB/DVD.
- Select Repair your computer.
- Navigate to Troubleshoot > Advanced Options > System Restore.
- Proceed as usual.
This is the last line of defense before a clean install.
What System Restore Does (and Doesn’t) Affect
Understanding the scope of system restore is critical to using it effectively. Many users mistakenly believe it’s a full backup solution, but it has clear limitations.
Files and Settings That Are Restored
System Restore reverts:
- Windows system files and registry settings
- Installed programs and drivers
- System-wide configurations (e.g., firewall, services)
- COM+ databases and WMI settings
This makes it ideal for undoing software-related damage.
What Stays Unchanged
Importantly, system restore does not touch:
- Personal files (documents, photos, videos, emails)
- Passwords or user accounts
- Data stored on non-system drives (unless protection is enabled)
- Files downloaded or created after the restore point
For full data protection, pair system restore with regular backups using tools like Windows File History or third-party solutions.
Troubleshooting Common System Restore Issues
Sometimes, system restore fails to work as expected. Here are common problems and how to fix them.
“System Restore Did Not Complete Successfully”
This error can stem from:
- Corrupted system files: Run
sfc /scannowin Command Prompt (Admin). - Insufficient disk space: Free up space on the system drive.
- Antivirus interference: Temporarily disable real-time protection.
Try the restore again after addressing these issues.
Restore Point Not Available or Missing
If no restore points appear, check:
- System Protection is enabled (via “Create a restore point” tool).
- Disk cleanup hasn’t deleted restore points (e.g., using Disk Cleanup’s “Clean up system files” option).
- Third-party optimization tools haven’t disabled the feature.
You can also use WMI commands to list existing restore points via PowerShell.
System Restore Fails to Boot
If the restore process itself crashes:
- Try an earlier restore point.
- Use Safe Mode or WinRE for restoration.
- Check for hardware issues (e.g., failing hard drive).
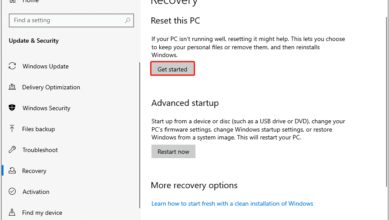
In extreme cases, consider resetting Windows via Settings > Recovery > Reset this PC.
Best Practices for Using System Restore Effectively
To maximize the reliability of system restore, follow these expert-recommended practices.
Schedule Regular Manual Restore Points
Make it a habit to create a restore point before:
- Installing new software or drivers
- Updating the operating system
- Editing the registry
- Running system-critical scripts
Label them clearly so you can identify them later.
Monitor Disk Space and Protection Settings
System Restore requires free space to function. Check periodically:
- Open “System Protection” and verify the protection is on.
- Ensure at least 5% of your drive is allocated (more for active systems).
- Avoid third-party cleaners that delete shadow copies.
Windows automatically deletes older restore points when space runs low, so don’t rely on ancient snapshots.
Combine with Full Backups for Maximum Safety
System restore is not a replacement for backups. Use it alongside:
- File History: For personal data.
- Full disk imaging: Tools like Macrium Reflect or Acronis True Image.
- Cloud backups: OneDrive, Google Drive, or Dropbox for offsite protection.
This layered approach ensures you’re protected from both system failures and data loss.
Alternatives to System Restore
While system restore is powerful, it’s not the only recovery option. Explore these alternatives when needed.
Windows Reset This PC
This feature reinstalls Windows while preserving or removing your files:
- Keep my files: Removes apps and settings, keeps personal data.
- Remove everything: Full wipe, like a fresh install.
Access it via Settings > Update & Security > Recovery. Learn more at Microsoft’s Reset Guide.
Third-Party System Recovery Tools
Tools like Macrium Reflect, Acronis True Image, and EaseUS Todo Backup offer:
- Full system imaging
- Scheduled backups
- Bootable rescue media
These are more robust than system restore but require setup and storage.
Using Command Line and PowerShell
Advanced users can manage system restore via command line:
rstrui.exe: Launches the System Restore GUI.sr.msc: Opens System Restore settings.- PowerShell: Use
Get-ComputerRestorePointto list points.
These are useful for scripting or remote troubleshooting.
What is system restore?
System Restore is a Windows feature that reverts system files, settings, and programs to a previous state without affecting personal files. It helps fix issues caused by software changes, updates, or installations.
Does system restore delete my files?
No, system restore does not delete personal files like documents, photos, or emails. It only affects system files, installed programs, drivers, and registry settings.
How do I enable system restore in Windows 11?
Go to Settings > System > About > System Protection. Select your drive, click Configure, and choose “Turn on system protection.” Adjust disk space usage and confirm.
Can I use system restore if Windows won’t boot?
Yes. Use the Windows Recovery Environment (WinRE) by booting from a recovery drive or installation media, then navigate to Troubleshoot > Advanced Options > System Restore.
How often does Windows create restore points?
Windows automatically creates restore points before major events like updates, driver installations, or software setups. It also creates a weekly restore point if no other events trigger one.
System restore is a powerful, built-in tool that can rescue your PC from software-induced disasters. By understanding how it works, enabling it properly, and using it wisely, you can avoid hours of reinstallation and troubleshooting. Combine it with regular backups and smart computing habits, and you’ll have a resilient system that bounces back from almost anything. Whether you’re a casual user or a tech enthusiast, mastering system restore is a skill worth having.
Recommended for you 👇
Further Reading: